Tuesday, December 3, 2013

Perfect Housewarming Present

The older I get the more housewarming parties I'm beginning to attend. I never know what to give but I did know I didn't want to give something generic. I decided to pinterest unique housewarming presents and gained so many ideas! 

My friends grew up in the same hometown and moved in together so I decided to create something that would mean something to them. I made a "home is where the heart is" map frame. 


I bought a three window frame from Target for $15.99. I then went home and printed out a map of their hometown and a map of their new town. I cut the maps in the shape of a heart and found a cute quote about home. I added a piece of colored card stock behind the frame and that's it!

This adorable frame cost less than $20.00 and is a meaningful present for any new home owners!

Unique Gifts for under $10.00!


I always try to create things that are outside the box just so I can give a one-of-a-kind gift! The first gift is the pizza pan magnet board.

One of the easiest things to make is a magnet board made from a pizza pan. I used a round pizza pan found at the dollar store, a fun piece of scrapbook paper from Michaels which cost less than a dollar, and glitter ribbon also from Michaels for $2.99. It took me all of 15 minutes to transform this pizza pan to a fun and practical dorm item!

First, I placed the scrapbook paper inside the pan and press it down to form an imprint. I used the imprint to cut the square paper into a circle. After it was cut, I used tacky glue and glued the paper into the pan. 

Then, I used the glitter ribbon and carefully glued as I placed the ribbon around the edges. This step will be easier and faster if you have someone glue as you place the ribbon. 

While that's drying, I started to create the magnets! There are many fun and unique ways to create magnet but since my paper was so colorful I decided to go with a basic idea. I used an old scrabble letters and glued magnets on the back of the letters I chose. This is a really quick and easy way to make some personalized magnets!
Once the glue has dried i attached ribbon on the back with hot glue to hang it and that's it!


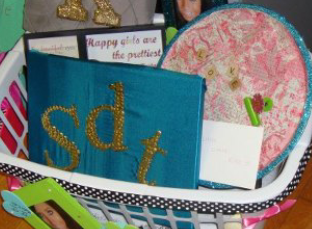
Next, I created the push pin canvas. This was an extremely easy project that looks great! I bought a canvas 2 pack from Wal-Mart for about $6.00 and a yard of fabric also from Wal-Mart. 
I bought plain gold push pins from the dollar store and that't it! 
I went home and printed out the letters I wanted to use so I had a template behind the push pins.

I started by stapling the fabric to the canvas and made sure I pulled it tight.
 I cut out the letter I printed out and started pinning it down the canvas. 
This is a great project and will create a wow factor in any room!

DIY Chevron Curtains

Chevron is the new in pattern and finding chevron curtains isn't that hard but can get pricey. I've decided to make my own chevron curtains. I already had a set of plain white curtains, but you could use any color. I then Googled chevron pattern and found a stencil that was the width I was looking for. They have so many different sizes its good to research what size you want. After that I started tracing my pattern on the curtain and covered the white area with painters tape.
I'm not a perfectionist by any means and I don't think chevron curtains need to be completely even because of the flowy fabric. 
After the entire curtain was taped, I used a sample sized gray paint which costed $4.00 and painted every other panel gray.

I waited for the paint to dry, removed the tape and here they are!

These fun curtains we're very easy to create. The entire project costed me about $10.00 and 1 hour of my time. Now I have chevron curtains and if I decide to change my design in my room I didn't waste a lot of money!


DIY Spongebob Costumes

Halloween costume always cost so much for such generic ideas. This year, I've decided to make a costume to not only save money but have something unique. After talking with my friend, we decided to be spongebob, barnacle boy, and mermaid man for Halloween. I immediately went to Google and searched all over for DIY spongebob character costumes. I found some finished outfits but none where they said how they made their costumes. 

After finding a picture of mermaid man and barnacle boy. my friend and I went to Wal-Mart to start getting everything we needed. We bought plain black shorts, I bought a blue scarf for barnacle boy, and my friend bought pink slippers for mermaid man. We then headed to Target and found a yellow t-shirt for spongebob. We went to a little boutique and picked up orange and red long sleeved shirts. I bought the rubber gloves at the grocery store in green and blue and used yellow duck tape over a belt I already owned to make the belt the duo wears. The last stop was the party supply store where we found the green tights, purple face paint, spongebob mask and the sailor hat. I already had the fake glasses bought those are easily found at any store now a days. 

To create the belt, I printed off an M and sea shell on colored card stock. I cut it our and glued it to a piece of cardboard to keep it study. I then glued them to the belts and voila! The seashell bra was created the same exact way on mermaid man. In order for me to create my flippers, I cut the blue scarf from Wal-Mart and hot glued it onto a pair of tall boots I already owned. I used hot glue because I was able to peel it off the boots once I was done. I created the flipper base with card stock and cardboard and attached a piece of elastic( I used a hair tie) so it would wrap around the base of my shoe.

Creating the spongebob costume was pretty easy. We found a yellow t-shirt at Target for $4.00. We then bought black paint and used a foam drink holder and the bottom of a little birdhouse found in the dollar 'section as the stamps. It really worked out because they weren't perfect circles which really made it look like sponge. Make sure to keep cardboard in between so the paint doesn't bleed through. The rest of the costume was khaki shorts, tall white socks, dress shoes, a white polo underneath, and a red tie.


Here's the finished Halloween costume for all of us! With using things we already owned and incorporating creative items each costume costed only $15.00!

Birthday in a Box!

With my hectic work schedule, its hard for me to make it to all the important birthdays their our in my life. When my little sister in my sorority turned 21, I knew I wouldn't be able to celebrate the same night as her birthday because of the day it landed, so I wanted to do something for her that was special. I decided to create her a birthday in a box!

I took a cardboard box, and stapled fun paper and cut out the 21 from cardstock. I filled the box with packing peanuts and wrapped them in tissue paper. I then filled the box with lots of fun things! I bought a pack of fun shot glasses, mini bottles of alcohol, and cute drink mixes I found at home goods. I then bought her a cupcake and found a cupcake to go container at Wal-Mart which was perfect for this present! I put her favorite candy in the box and made a 21st birthday scavenger hunt with lots of fun things to do at the bar! The last thing I added was an Alex and Ani bracelet because I wanted to give her an actual present as well.
This entire present cost me less than $60 including the next day shipping. This is a perfect way to make any occasion extra special!

Monday, December 2, 2013

Black Friday Deals!

Black Friday just passed and I can't wait to share all the deals I was able to get! Figuring out where the best deals are pretty much overwhelms me. I spent about an hour looking for major deals like TVs but then went to the mall with no expectations after that!

I started at Wal-Mart with about the rest of the state, trying to push my way to the line for the advertised $98 TV. Unfortunately, because I wasn't in line hours before the sale started, I wasn't able to get the TV right then and there but I was able to pay for the deal and order it online. Honestly, getting the deal and waiting a week for the TV was worth me being inside Wal-Mart for only 30 minutes while others spent their entire Thanksgiving waiting!

Next! On to the mall for some unbelievable sales! Starting at H&M I grabbed some adorable long cardigans originally $34.95 on sale for $9.95! These cardigans are great for a casual work look or just running around. I also picked up an over sized sweater for only $12.95.

As a walked around looking for deals I couldn't resist I stumbled into Old Navy. They're entire store was 50% off! I was able to grab a winter pea coat, 7 tops for me and my sister, 2 rings, a cute to-go cup, 2 zip up fleece jackets and 3 pairs of leggings all for $170.00! I was shocked by the amount of things I was able to get at such awesome prices!

My last stop on my Black Friday journey was Target. They also had some unbelievable door busters! I picked up a black bomber jacket for $20.00 which is 50% off the original price. I got DVD's for $4.00 each and a blender cup for only $12.00!

Black Friday shopping although very overwhelming at times is worth the lines and the hassle to get great deals on fabulous items!